If you're not confident with DNS configuration (or you just want to keep it all in the family) you may wish to register your domain with Blogger itself. This uses Google Checkout and does all the DNS configuration for you, making it super easy and Blogger friendly.
However I like many digital citizens have a number of sites and domains on the web and I wanted to keep all my products together. Mostly due to the price factor I keep a lot of my domains at GoDaddy.com, they're cheap and cheerful just be careful to only choose the options you want because they keep their prices low by high volume and hard up sell. GoDaddy uses Pay Pal or Credit Card functions rather than Google Check out so keep your details handy. Don't forget that Revision 3 have regular discounts available on their podcasts, so you can feel good about giving them referrals.
Having registered my domain now it's time to configure all the DNS information.
Firstly you need to create a CName and an A Name for your domain and since I have registered my domain with GoDaddy a configuration guide is available here along with many other common domain registrars.
If you are using GoDaddy you will need to access the Zone File Editor from the DNS Manager, it is not an obvious link so look out for it. GoDaddy sets up all domains with a number of 'obvious' CName entries such as FTP or WWW. If you are using another registrar you may need to create the subdomain CName entry. If you set up a CName of WWW then this will allow you to access your site on WWW.YOURDOMAIN.COM, a good alternative might be BLOG or ENTRIES, call it whatever you want!
Once you have created (or confirmed the existance of) your CName you need point to the blogger servers. If you are using a blank domain with no hosting on GoDaddy then the entries you are looking for will have an '@' symbol in the data line. In my case we are using WWW as the CName, this needs to be pointed at the Google server ghs.google.com so I update the configuration like so:
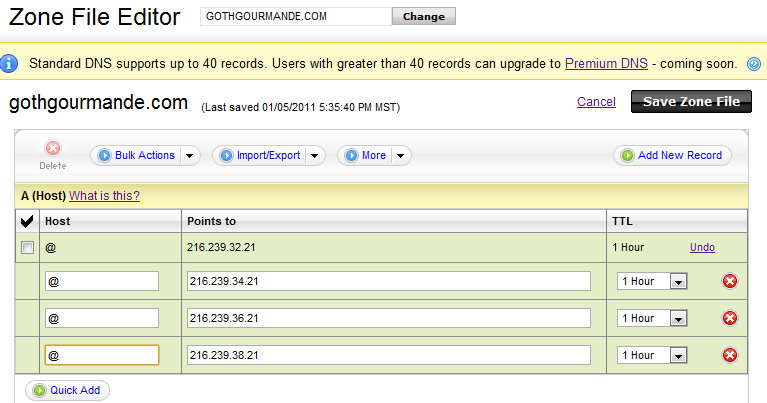
If you wish to have "naked" domains that is a domain that works without a subdomain address for example http://YOURDOMAIN.COM/ then you need to enter 4 AName entries:
216.239.32.21
216.239.34.21
216.239.36.21
216.239.38.21
216.239.34.21
216.239.36.21
216.239.38.21
In the GoDaddy configuration this looks like so:
Keep in mind that you need to wait out the TTL time before the DNS server will update your new configuration out to most networks, this is generally a day or two, however if you are in a rush then you may wish to update the TTL time to a lower value so that the new domain updates soon to local networks. Save your Zone File and the DNS configuration is done, now to update your Blogger with the new domain.
In your Blogger account select your blog and then go to Settings --> Publishing. Here you can select a Custom Domain instead of publishing to Blogger, as we have already purchased the Domain at another Registrar we need to choose Advanced Settings to add our vanity domain.
Once this is done you should see confirmation that your Blogspot account is associated with your Custom Domain, but keep in mind you need to wait out the TTL time that you specified in the DNS Zone File editor.
thanks... you saved me a lot of time :)
ReplyDeleteWe provides Whois db & daily list of Newly Registered Domains with whois information containing Phone number, email & address etc.
ReplyDelete